- Qualcomm Launches Snapdragon 4 Gen 2 Mobile Platform
- AMD Launches Ryzen PRO 7000 Series Mobile & Desktop Platform
- Intel Launches Sleek Single-Slot Arc Pro A60 Workstation Graphics Card
- NVIDIA Announces Latest Ada Lovelace Additions: GeForce RTX 4060 Ti & RTX 4060
- Maxon Redshift With AMD Radeon GPU Rendering Support Now Available
Social & RSS Feeds
Latest Videos


Latest News
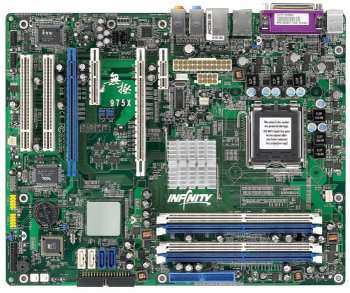
DFI Infinity 975X/G
by Greg King on December 8, 2006 in Motherboards
Long known for their overclocker friendly motherboards, DFI is back with a board for the highly popular and extremely powerful Core 2 Duo. Using Intels 975X chipset, the DFI Infinity 975 X/G looks to introduce the enthusiast crowd to Conroe, DFI style. Using the BIOS that shipped with the board, we got less than spectacular results, forcing us to go with a popular Beta. How high could we get the FSB and is the board worth it?
Page 1 – Introduction
|
|
If you’re a computer enthusiast, more than likely you have heard of DFI. Long known in the industry as an overclockers best friend in the motherboard arena, DFI has produced some of the best performing motherboards to date. Their LanParty series has catapulted them to the top tier of enthusiast motherboard manufacturers by offering superb performance and an ungodly amount of extras bundled. While the LanParty has garnered all of the accolades and attention, the Infinity series of motherboards has been around for those of us with somewhat restricting budgets.
With most of the attention going to the LanParty series, the Infinity can sometimes be looked over. While the Infinity series lacks the bundled extras that the LanParty offers, it still gets its fair share of attention from the DFI engineers.
Now that 2006 is almost behind us, looking back, it’s obvious that the CPU market is nothing like it was this time last year. Intel has retaken the performance crown from AMD, dual core CPUs are a common place and more importantly, affordable and the emergence of quad core CPUs is happening as well. The DFI Infinity 975 X/G, which we are working with today, uses the same 975 Intel chipset that has been around for a while now. Using this chipset, the 975 X/G is Core 2 Duo ready and with a BIOS upgrade, quad core ready as well. With the following that DFI has developed, there is a lot riding on this motherboard and in working with the 975 X/G over the past 4 weeks, we have been working with it to find out if it’s truly a board that the Core 2 Duo crown has been waiting for as well as if it’s a value to the consumer as the Infinity name implies.
About the 975 X/G
- LGA 775 socket for: Pentium D, Pentium 4, Celeron D, Core2 (Conroe family), Quad Core processor (Kentsfield) read
- Supports Intel Enhanced Memory 64 Technology (EMT64T)
- Supports Enhanced Intel SpeedStep Technology (EIST)
- Supports Intel Hyper-Threading Technology
- Supports 1066/800/533MHz FSB
- Two PCI-Express x16 slots (either x16 and x1 or x8 and x8) with ATI Crossfire support
- One PCI-Express x1 slot and one PCI-Express x4 slot (either x1 and x1 or one x4)
- 1 Legacy PCI Slot
- Four SATA 3Gbps ports and a single IDE channel
- 1 external Firewire port via the Firewire VT6307
- Eight USB 2.0 ports, four internal and four on the rear I/O
- Realtek RTL8111B PCI-Express Gigabit Ethernet
- Realtek ALC882 High Definition audio codec with 8 channel sound support and S/PDIF
- Intel chipset supports:
- Four SATA ports
- SATA speed up to 3Gb/s
- RAID 0, RAID 1, RAID 0+1 and RAID 5
- JMB360 chip supports:
- One eSATA (external SATA) port
- SATA speed up to 3Gb/s
- Intel 975X Express Chipset
- Northbridge : Intel 975X Express
- Southbridge: Intel ICH7R
Packaging and Layout
DFI clearly wants to distinguish their Infinity boards from the LanParty board that they have built their name on. As the box shows, its nothing like the LanParty boxes but still informative.


|
|

Support our efforts! With ad revenue at an all-time low for written websites, we're relying more than ever on reader support to help us continue putting so much effort into this type of content. You can support us by becoming a Patron, or by using our Amazon shopping affiliate links listed through our articles. Thanks for your support!